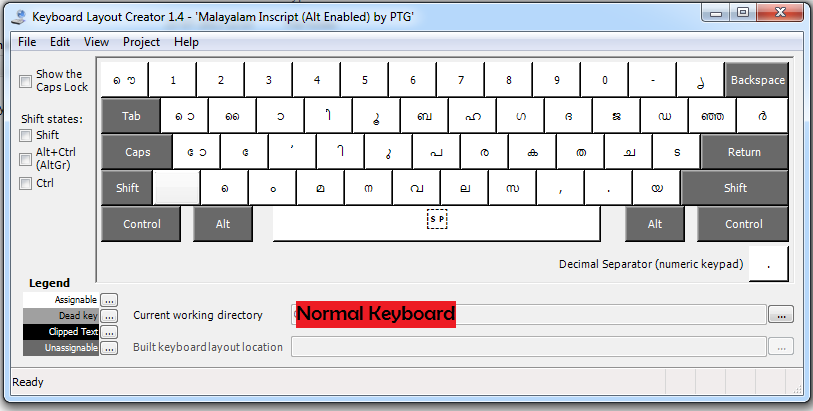
There are different methods to input Malayalam in computer. ISM, Google IME / Transliteration, InScript etc are some to name a few, that lead the chaos. It is a sad fact that Malayalam still does not have a standard or perfect keyboard, which is compatible in all machines or works in all environments.
Majority of the publishing houses and DTP centers use ISM 4(cracked) to input Malayalam. The said technology has far outlived its original life span. It is because, ISM is based on ASCII (8bit) font and is no longer supported by Windows. A document created in ISM cannot be emailed unless the recipient too have ISM installed in their computer. It can neither be searched nor indexed. The hard truth is ISM is dead. It is better for everyone to move out of ISM and adopt new technologies to input malayalam.
The next popular method is Google IME / Transliteration. The said technology is based on phonetics or ManEnglish. It is most popular among youngsters and bloggers. In fact, Google IME is the true reason for the rampant increase in malayalam blogging in the Internet. However, the said technology has its own limitations. Google IME cannot be used for professional malayalam typing. It is more for fun, than for serious substance.
The least popular, but the true future of malayalam, lies in InScript Malayalam Keyboards. They are supported by all including, Google, Microsoft and Government of Kerala as well. Inscript Keyboards uses Unicode Font (32bit) and it permits sorting, searching, emailing etc, without any trouble. This blog is in quest for the perfect-standard In script Unicode keyboard for Malayalam.The layout for this keyboard is based on C-Dac’s Inscript keyboard provided here, and Ralminov’s keyboard provided here.
Features of August 2012 Version
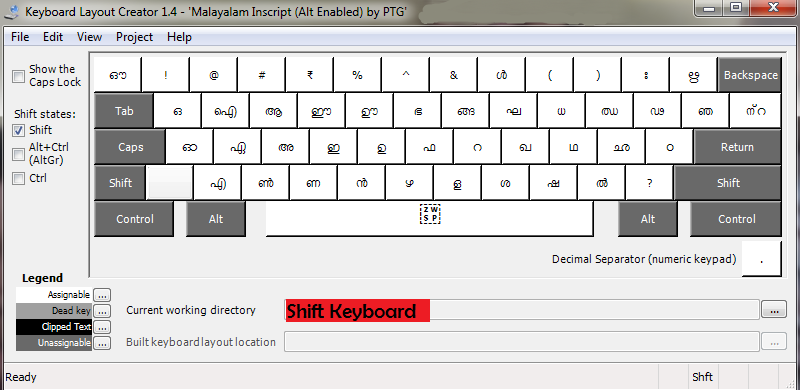
- Inta ‘ ന്റ ‘ in a single key keystroke ( Shift + \)
- Included Rupee Symbol ‘ ₹ ‘ (Shift + 4)
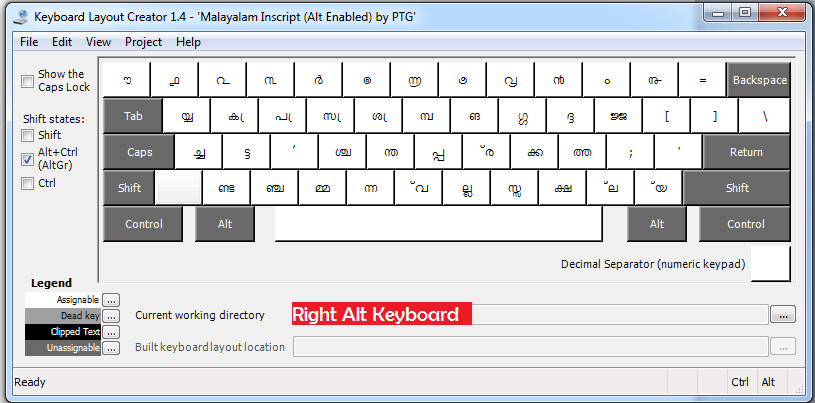
- Imba ‘ മ്പ’ single key keystroke (Alt Gr +Y )
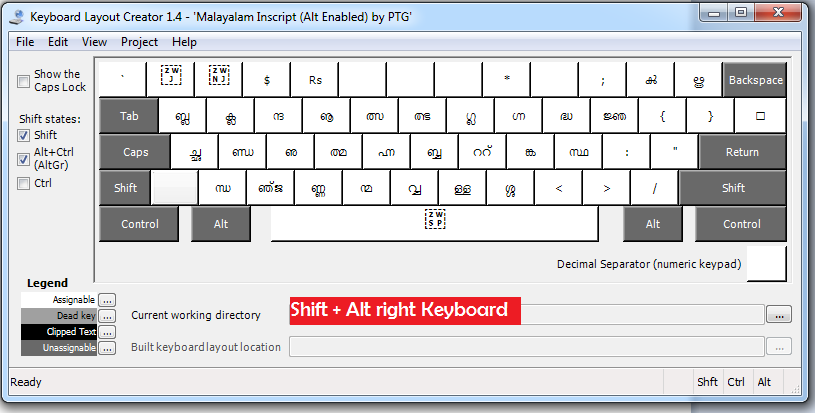
- Immba ‘ബ്ബ’ moved to ( Shirt + Alt Gr + H)
- Vu (Va small) ‘്വ’ moved to (Alt Gr + B)
- yya (Double ya) ‘യ്യ’ moved to (Shift +Alt Gr + \)
- Included ‘/’ symbol at ( Shirt + Alt Gr + / )
- kr ‘ ൿ ‘ moved to Shit + Alt Gr + – )
- $ moved to Shit + Alt Gr +3
- Rs inserted at Shit + Alt Gr + 4
2013 Edition
- Letter `ൊ` & `ഒ` shifted to Q for greater convenience
- Letter `ൌ` & `ഔ` shifted to ` , left to number 1
- Letter dot (small of ർ) included in Shirt+AltGr+\
- See the layout pictures for more information
Sept Edition
- Letter `ണ്ട` movied to Alt Gr+Z for greater convenience
- ‘ങ്ങ’ placed to Shirt+U & ‘ങ’ movie to Alt+U
—->>Click here to download Malayalam keyboard 2013<<–
—>>Click here to download the latest compatible Malayalam Unicode fonts<<–
(I suggest you use, either anjalinewlipi or kaumadi as the font)
Keyboard Layout Screenshots
Shift Key +
Right Alt Key (Alt Gr) +
Shit + Right Alt Key (Alt Gr) +
Requirements
Windows 7, Office 2010 (Preferred)
- If your windows in old version, see how to setup malayalam reading here [Do not download the old fonts suggested there]
Windows update to support the new currency symbol for the Indian Rupee : Click Here
- If your windows in not genuine download the above update from : For x86 machines ; For x64 machines
Office Language Interface Pack : Click Here
“ന്റെ” യുടെ ഒടുവിലത്തെ കഥ.
The main reason which prompted me to develop a keyboard of my own was due to the inconsistency in inputting the letter ‘nte’ (ന്റ) in Malayalam. Till 2001, ‘nte’ was inputted through keys ന+്+റ. However after 2001, Microsoft introduced Kartika Unicode Font along with Windows XP, which permitted typing ‘nte’ only by ന+്+zwj+റ. Many authors and developers criticized the said method as incorrect here, here and here.Unicode suggest an altogether a third method by ൻ+്+റ (See here)
So I have used ന+്+റ, the first and oldest method, still followed in ubundu and all, as the standard, for the time being, till the matter is resolved finally.


